Review

Review of the Seiko SKX781 "Orange Monster" Automatic Dive Watch

Old is new again. Part of the geek cred is to appreciate watches. Form and function -- What's not to like? I went from super thin swatch purchased in Tokyo, to my first "expensive" watch, the Bell & Ross Fusion, purchased at London Heathrow's duty free shop, to a series of G-Shocks, perhaps reflecting on practicality of the last few years.

I was all ready to continue my G-Shock / tool watch collection with the PAW 2000, the "gentlemen's ABC Watch (That is Altimeer, Barometer and Compass) -- the ultimate in the sports tech watch. 20+ functions. More raw computing power than my first computer. Then I stumbled upon the Seiko automatic dive watches. Automatic meaning the watch is automatically wound as you move the watch about with the natural movement of your arm. Yes -- this means the watch is a pure mechanical device. No quartz, no battery, no solar power, no radio sync. It's all stainless steel enclosing gears and springs.

A pure mechanical watch. The Seiko SKX781  "Orange Monster" Automatic Dive Watch. 7S26 movement.

The Appeal

I never like flashy watches. Oversized watch falls into that category. That's why I never liked them. These dive watches are large and thick but not overpoweringly large. The only thing that this particular model is the orange face, which will catch your eye if you look closely. But it is not a "look at me" type of loud.

Without the flashiness, the remaining stainless steel look is more utilitarian, more industrial, more modern. That of course is ironic since this is a design from the 70's. Very much like the minimalist / industrial design that is hot now. Old is new again, for the better.

First Impression

The watch arrived in a proper watch box, with a pillow holding the watch. What presentation! Even the more expensive G-Shocks comes on a plastic holder inside a cool tin box. This Seiko is old school all the way.

The Weight -- this thing is heavy! It is several times heavier than the G-shocks. It bothered me for about five minutes, and then I don't feel it anymore. In fact I like the weight now. Because of the weight I wear it a little tighter than I wear the G-shocks, and it actually feel good. It feels like part of my arm now.

The manual operations

I must amid, wearing the watch across the end of November period and realized I have to manually change the date from Nov 31st to Dec 1st was a slight annoyance. But like most manual tool, it is a way to bond with the tool. There is a relationship between the user and the tool. It requires care and feeding. It is not "use and forget".

Adjusting the Band

I will detail the process in a separate post. Basically I purchased a few cheap tools from the internet and adjusted the size of the watch band myself. It was much easier than I thought. Now the watch fits like a charm, even on my small 7.5 inch wrist.

Now I am saving up for the next classic Diver, the Seiko SKX007. Not to mention the joy of finding alternate watch bands.Reference:

For more information than you need on this and other Seiko dive watches, read this article.

[AMAZONPRODUCT=B000EPLR2G]

Amazon Kindle is still King

I am as much of an Apple Fan as the next person. I stood inline for six hours for my last iphone. But I don't have an iPad. And I have the original Amazon Kindle. Every time I pick up my Kindle and start reading, all doubts fade away. The device is easy to hold. The print is crisply readable. The book selections are great. Although thanks for Apple, the book prices have increased. I just want a cheaper Kindle (so I don't have to baby it as much), cheaper books, and a way to share books. The only real issue is that books has to be formatted correctly when there are diagrams.

We do not need a colored Kindle. We do not need a touch screen.

Broher MFC 7840W wireless network multiple function printer review

For the new office I need a new printer. Specifically the requirements are:

  • works well with Mac and PC
  • works well with Linux a plus
  • need a copier function -- we don't print much these days, but we do have the occasional copy need, copying sketches made in meeting for clients for example
  • reasonably fast
  • laser instead of ink -- ink is too expansive to run
  • wireless so that I don't have to worry about placement

Verdict

I settled on the Brother MFC-7840W. It is an older model, and a mid range machine. Has all the usual features including network scanning. The verdict? B++. You can often find this discounted to about $250. A high yield toner cost around $40.

Likes

  • machine is reasonably well built, still lots of plastic parts of course, at this price point
  • print fast, print quality is good
  • works easily with Linux, some of our developers are happy
  • works with mac, I am happy
  • copier works

Minor Dislikes:

  • network scanning is so slow that it is not usable (I expected this before buying it). Use my wonderful Fujitsu ScanSnap instead.
  • The Mac control center software (not required) while works is ugly and not friendly.
  • The wireless connection would fail every few days, requiring a quick power off/on on the printer -- this is the only real annoying part. Have not troubleshooted this one yet.

Over all, it works and I am happy with it. See some pictures below, notice how many little blue tapes it used in packaging.

[flickr-gallery mode="photoset" photoset="72157623758889121"]

iPhone 3G Day 5

Day 5 using the new iPhone. I love it. I thought about it before using the verb "love". It is fun to use. it works. It's sexy. I find myself using it instead of the laptop (which is already on) to check emails, for example. It works and feel better than the Treo. Typing is a bit better now. Downloaded a bunch of free apps. Even used the map to locate a restaurant's phone number on the road, exactly like the Apple Ad. Bought Bejeweled 2, which I had (free) on the Treo. The camera works and it's a little better in resolution than the Treo. Duh: As everyone has said, the AppStore is the killer app. They took a page from Amazon's Kindle, there is nothing like two or three clicks and 20 seconds installation of an app.

Problems: The phone seems to get slowed down every so often. Seems like it happens when it is doing networking. Safari sometimes just stops. A few times doing something in an app will bounce me back to the home page(s). It is a little annoying at this point. I am still trying figure out which application has landscape mode.

Interesting observation: Very young kids have not problem using it at all. The touch interface is intuitive to them. Computer savvy non Apple people seems to have the most problem using it.

Next? debating to try out one of the paid driving games, and one of the paid shopping list app. On the treo there is a great free shopping list app that I use.

Waiting: WordPress app, and a better RSS Reader.

My New iPhone 3G

Yes. I got one. Spent total of six and a half hours. Worth it? Yes. Weather was nice, a little hot but not too much. Apple staff were very nice. Especially Alex -- She worked the line. Gave out (free) water, candy, went to get sunblock and more candy, even picked up a pizza for someone, then popsicles, and more water. They try very hard to make the waiting bearable. Why did I do it? I live very close to the Boston downtown Apple store. Drove by the night before, no more than 20 people where in line. Figure I will walk over at 7:30 to see the situation. There were about 400 people there. Decided to wait for one hour to see what happens. They said they have 40-50 reps in the store doing iPhone setup. It was true. The entire store was setup for the launch. After getting into the store, you line up around the central circular staircase, and they have individual reps meeting the head of the line, taking you up stairs to start the purchasing experience. The rep that I had, Ryan, was super patience when we hit some sort of AT&T error and had to call two different AT&T rep over the phone to get one that "helped". They have subtle touches like keep giving me a store phone to play with during the process, to complete the experience.

I stayed because during the first hour, the line moved so quickly, more than 100 people I think were in. Looking good? Until the ITMS crashed, halting the activation processing. Then they said AT&T was having problem as well. So the next two hours were mostly waiting and chatting with the neighbors. By noon time things were moving again and I was out by 2:30 with about 20 minutes spent with the AT&T problem. ITMS was still slow, so I did not get the phone itself activated until I got back into the office. The account was activated and number transfered (from Verizon) very quickly. In fact there was an hour or two I was without a working phone because the Verizon account was closed and the new iPhone was not working yet.

This is my first iPhone. Switching from Palm OS is a big switch. I am still learning it. But it is worth it, so far. More functional review next post.

Review Extech Digital Multimeter EX330

My DMM arrived today from Amazon. First surprise -- I came in a blister pack. The good nice is that it is an easy open blister pack. Remove the lone staple at the top and pull open the pack top to bottom. The bilingual (English/Spanish) user manual is tugged inside the backing paper sheet.

The meter comes with a temperature "probe" and a pair of test leads. The test leads are actually of good quality. Flexible lead. both ends of the tips are covered with a reusable plug. The unit ships with batteries installed. Since it is under a screw, I did not open the battery compartment to see what's inside. The meter itself sits inside a orange soft plastic "holster" which is more of a protective outer skin. I have to take the meter out of the "skin" to get to the back of the meter for the compartment. The "stand" is actually a hinged piece of hard plastic that is pivoted on the back of the "skin", not on the meter. It has only one "open" position, standing the meter at a 45 degrees angle. It seems to work well although not very stable.

The center function select dial works fairly well. It has a plastic click sound that is indicative of a not very high quality switch. Switching from OFF to other modes, it sometimes does not come on. I have to wiggle it a little or switch it back and forth between modes or back to OFF to make it work. I suspect after using for a while I can figure out exactly what is the issue. The five rubber push buttons at the top under the LCD area feels like typical calculator keys, but with a soft rubber coating.

The "MODE" key is use to select the actual function after using the dial to select a major function. For example, the diode test, continuity test, resistance and capacity tests are all under the same dial selection. You have to press the "Mode" switch and look at the LCD to switch between the diode, continuity modes.

The "RANGE" key is used to exit auto range. Auto range is on by default when you switch the DMM on. THe range key will turn the auto ranging mode off, taking the "Auto" display off the LCD. Once off, you use the "RANGE" key to step thru each range. However, to go back to auto range, you have to hold the "RANGE" button down for 2 seconds. It is not simply one of the range selection as you cycle thru the different ranges.

How does it perform? I cannot tell you !! I don't have anything to compare it to, but it seems to do all the basic measurements ok. I cannot say anything about it's accuracy. So, for fifty odd dollars, it's not a bad investment.

Snap Circuits SC 300

My love of electronics and computers, which defined my career, can be traceback partially to having a electronic building block toy when I was very young. Back then, we do not have Snap Circuits. The toy/kit that I had was more powerful and less user friendly. You can only buy that kit as a specialty item in Japan now. It is part of the Otona No Kagaku series, meaning "science for adults". There is a website that you maybe able to order one. Mine is the old version of the EX-150. A similar Germany version is still available at Lectron Electronics.

Anyway, back to the easy way -- Snap Circuits. When I looked at the pictures I never thought it was any good. It definitely is on the simple side on the electronic circuits that it builds. I gave one of these as a Christmas present to someone and I got a chance to play with it. I was surprised that it was a pretty good kit. Very easy to "use". So it is well suitable for younger kids, as an introduction to basic circuits. You can find the manuals online to check out the kids.


Infrant NV+ RAID Failure, and replacement Part 2

*Updated*: This is the link to the official instructions (too late).

The replacement power supply unit arrived from Infrant. There are no instructions accompanying the unit. So I started to look around the NV+ to see how I can open it up and perform the replacement:

1. Take out the disks after labeling them. I think their order in the NV+ is important. Make sure bay one goes back to bay one, etc.

2. Loosen some screws in the back and the bottom. Turned out I have to start with the sides, then the fan, then the bottom, which is the PSU itself.

3. Notice all the dust gathered inside. Look at the pictures.

4. Then it's a matter of taking the PSU cable off and plugging in the new one.

5. Don't forget to transfer the serial number sticker from the old PSU to the new one before sending it back!

6. Check out the burnt coil in the picture.

7. Finally, don't forget to download and install the plug-in to up the fan speed to reduce the temperature. Otherwise it will burn out again!

It's basically not too difficult.

D70_22576

Reducing Junk Mail, part II

I blogged earlier, I decided to give 41pounds.org a try. They will help me reduce my junk postal mail. I got a packet from them. It contains six pre-filled post card addressed to various data services. They even included the stamps. I am to sign the cards and mail them back to those service centers; requesting them to remove my name from their lists. The services include:

  • Mike's Market Share
  • Readers Digest !?
  • Abacus Direct
  • Info USA / Donnelley Marketing
  • Haines Criss-Cross Directory
  • Publishers Clearinghouse

Case for the new iPod

So I have my new 3rd gen iPod Nano. I need a case. Not much choice at this point. So it's time to start a watch list:

new iPod Nano and Apple Marketing

I bought the new iPod Nano. It's good for travel. It's good for workout. It is half way between the shuffle and the full size iPod (classic or the other generations iPod's). I owned a first generation iPod, it was too big/heavy and lack storage. I sold it. I owned a first generation shuffle, used it for a few months, great for portability, but lack of a screen killed it for me.

The new Nano is perfect. It is a better Nano since it is actually smaller. You have to hold it, and use it, to understand the new form factor. All I need now is a case for it.

iPod Nano and Shure E500

Apple Marketing? I own other Apple products. I purchased everything else online. For the Nano, I headed to a physical store to look at the colors in person and bought it there, Friday evening. I got home, and an email arrived in my email inbox, with my recent, from the store. Then I received a welcome to the iPod family email the next day. The fact that Apple managed to link the in-store purchased back to my Apple account electronically is, amazingly well done.

Squeezebox Review

Some products are truly innovative, and creates its own genre. The iPhone is one. The Squeezebox, reviewed here, is another. Squeezebox V3 with remote

What is it? 
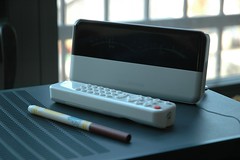
The squeezebox (version 3, white) is a network music streaming device. It stream music from a music server (you supplied, see later) wirelessly or via a wired home network. You normally hook it up to your stereo to play the music. What makes it unique is that it has a flexible digital display. You use the remote and the display to control the device. There is no need for a monitor, keyboard, nor mouse.

What's the other cool stuff about it?

  • it serves my Apple Lossless music tagged with Japanese and Chinese names, displayed correctly on the Squeezebox screen.
  • It has optical out, which I will use later to get a even better quality audio signal
  • Using the IRBlaster plugin and the $7 connector, the Squeezebox remote power my receiver on/off, and adjust its volume.
  • Using different plugins, I can display other information on it -- weather, stock quotes, the last is endless

Unboxing The unit arrives in a cubish box. The items are very packed. The box is designed for easy unboxing -- I love that. The main unit is suspended in foam bookends. The accessories are in a box in the bottom. They kindly included two "finger" holes at the top of the box so that you can pull the box out of the main box easily. Good design number 1. Inside the accessory box, there is a small section that holds the remote. Again, they provided a pull-tab so that you can open that part easily. I am impressed with this company already, and I have not used the actual product yet.

Squeezebox Remote

Setting up the Squeezebox On power-up, the box automatically prompt you thru the setup, starting with network setup. You have to use the remote to answer questions and optionally input things like IP addresses. I always have problem with the DHCP server on my router, and I ended up having to manually enter a static IP for the squeezebox itself. And don't forget, if you have wireless LAN security like MAC filtering, you have to enable the squeezebox on your router first. The MAC address is on the label at the bottom of the unit. The entire setup should only take a few units. Again, this user interface actually works!

Setting up the Music Server The music server is a piece of software called SlimServer. It is free. You can install and run it on a Mac, a PC, a Linux box, or even some dedicated hardware (see later). Now a little bit about my music setup:

I use an iMac as my primary music machine, meaning I rip my CD using the iMac and play most of my music using iTunes on this iMac. iTunes can stream music to an Apple Airport Express. That's how I play digital music on my main audio system in the living room. I also use the iMac USB output to play music on my vacuum tube headphone amp, but that's another story.

I store all the music files in Apple Lossless format, on a network attached device (NAS) called the ReadyNAS NV+ made by Infrant Technology. They just got bought by NETGEAR. This is a pretty expensive and serious storage device. I run it in X-RAID mode, so that it is unlikely that I will lose any of my music files due to harddrive failure.

Here is the interesting part -- back to the Music Server software SlimServer. It actually runs on this NAS. So I can have the NAS feeding the Squeezebox, without any PC/Mac in between. I tried it. It works, sloooowly. I read on many online forums that this setup is slow. And it is. On top of that, the software version is also a little out of date compare to the PC/Mac based version. At the end, there are three problems with using the SlimServer on the ReadyNAS NV+:

  1. It is slow (and I have the 1G memory version)
  2. The software is a few minor version behind
  3. It is much harder to install plugins, and the number of plugins available is smaller
  4. I cannot access my iTunes playlist since it is not stored on the NAS

So I tried running SlimServer on my iMac. It is much better. It is faster. Plugins become easy. I can use my iTunes playlist. I switched over to use the Mac version.

Hookup Squeezebox V3 Back

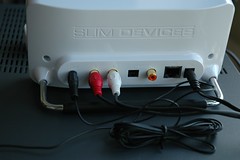
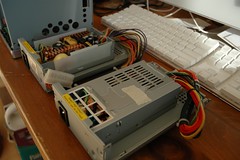
The squeezebox has a very small external power brick. It comes with a RCA to RCA cable to connect the squeezebox to your stereo using analog signals, which is the must likely scenario. If you want to use optical out to either a independent DAC, or a receiver that has optical input, you have to supply your own cable.

Squeezebox V3

IRBlaster controlling my Receiver 
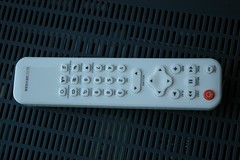
This works amazingly well. I am using a pretty high quality NAD receiver solely for playing the squeezebox music in the bedroom. Out of all the features, I only really need to switch it on and off, and adjust it's volume. Well, using the IRBlaster plugin and the $7 LED emitter plugged into the headphone out, I can have the squeezebox remote controls the receiver directly. When I press power-on on the squeezebox, it will turn on both the squeezebox and the receiver. When I press volume up, it will turn the volume up on the receiver (instead of changing the volume on the squeezebox).

Plugins This is one of the cool thing you can do with the Squeezebox. You can download and install all sorts of plugins that enhences the use of the device. These are the ones that I use:

IRBlaster Download it here. It is described in a little detail on the slimdevices wiki. You may need to hunt down the correct IR codes from the LIRC site. It is not very user friendly but it works. Create a directory on your computer and points IRBlaster to it to load the config file.

Somewhere hidden in the documentation, it says that the volume of the squeezebox is set default to 50/100 by IRBlaster. If that is not good enough you can change it by editing the config file and restart slimserver afterwards. For me, the value 50/100 gives me reasonable output volume with my amp, and it won't play too loud which is fine for for my bedroom system.

WeatherTime The other plugin that I use is WeatherTime. It display current and forcasted weather as well as date and time on the squeezebox. It uses weather.com, and you have to go thru a little configuration, but it is worth it. You can see the screenshots and download it from its website. This replaces the simple date/time display screensaver for me when the squeezebox is off.

Apple Mail.app strangeness on multiple accounts' sent mail

I switch between mac desktop, windows desktop, my smartphone, and pure web when reading and writing emails all day. Using IMAP, everything stays in sync -- one of the few wonders of the Internet. However, on the mac running Mail.App, I couldn't get my sent mail to store on the IMAP server for other to see. Finally, after googling a bit and testing it out a bit, I got it to work (with my Dreamhost IMAP servers). The short version says "highlight the Sent folder within my mailbox, then select from the menu bar: MailBox/Use this Mailbox for/Sent". Initially I was worry about this one because for some reason, the Sent folder for my first IMAP account never showed up under the account. Instead I just got one big "Sent" mailbox (icon=paper airplane) on Mail.App which seems to be displaying the Sent folder. So I couldn't do the "use this mailbox for sent" for my first account. Turned out Mail.App is just "smart enough" to move the first server stored Sent box out to the paper airplane mailbox. Once I set the second Sent box in the second account, both Sent mailbox/folder shows up under the big paper Airplane as sub folder.

Similarly, if you have multiple IMAP account, for each of them, do the "use this mailbox for" trick for each of their Sent, Drafts, Trash and Junk mailboxes. Then you will see top level "Inbox", "Sent", "Trash", and "Junk" mailboxes on the left hand side of Mail.App, each with subfolders underneath setup for each IMAP account.

I actually like this Mail.App layout. It groups messages by type and consolidate them from each IMAP account, if you want to see them consolidated.

New Apple iMoive supports Panasonic AVCHD !

Hot off the announcement press. Finally we have the complete solution to a great home movie setup. The new Panasonic video recorders are great, but until now you cannot edit the movies. Upgrade to iMove 2008 and you can.

The HDC-SD1, for SD card, and the HDC-DX1, for record directly onto DVD, are video recorder with great functions and features within the camera themselves. Look at the SD1 -- It is a 3CDD camera. It can record HD video onto SDHC cards. With the supplied 4GB card, you can record 45 minutes of video at the highest settings (HF, 13Mbps). It has Dolby sound recording, image stabilization, and a 12X high quality optical lens.

Q-BA-MAZE

Marble runs are always fun. There are lots of different styles out there. Most are either the blocked based like cuboro, or rail based like quercetti, or combination of both like haba.

Now there is a new kid on the "block". Q-Ba-Maze. It's a plastic cube based system with a different. See the interview, and check out his blog. He even lived in Kowloon !

BlogDesk vs BlogJet

I mentioned earlier that I was testing out BlogJet, a commercial blogging client for Windows with a 30 days trial. It's 30 days. I liked the product, it is very simple to use. It does not support Amazon associate product linking. If it did I might have paid for it. $39.95 is not cheap for a simple editor.

Now I am trying out the free BlogDesk. It is similar to BlogJet. So far it is working pretty well. In fact it auto detected my wordpress installation better than BlogJet. Let's see how well it works.