The RaspberryPi (RPi) is the little computer that could. $40, runs a version of linux. But can you use it for "serious programming", deploy "real" applications? Of course !
As an excercie, I decided to put together a RESTful API server, and a web interface to control the fun PiGlow LED display board on a RPi. This project uses:
- virtualenv
- flask
- flask-restful
- angularjs (ok this is really off the RPi)
- thread locking to control hardware access
- and most importantly, it let me use the RPi+PiGlow board as a remote display any where with network access.
You can see the code and documentation here on github.
Arhitecture
This diagram shows the overall architecture:
Hardware - PiGlow Board
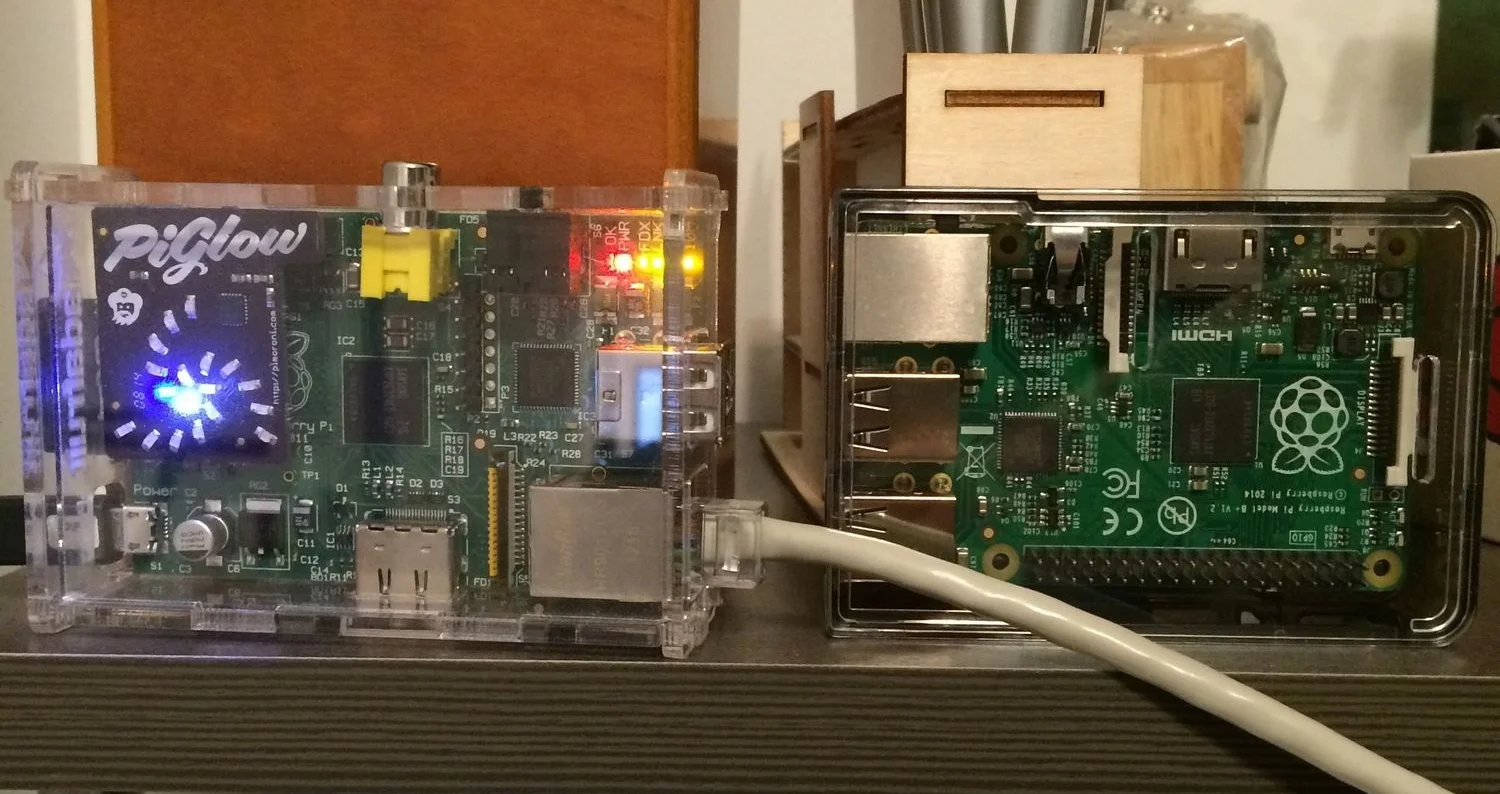
Get the PiGlow board from the PiHut if you are in the UK or Adafruit if you are in the US. This board provides 18 LED's with controllable brightness in 6 colors, arranged in a spiral pattern. Think of all the fun patterns you can generate. What makes the PiGlow board particularly great is that it is cheap ($15) and it plugs into the GPIO socket directly. (See Picture)
Basic Software
The PiGlow board is connected to the RPi via the i2c interface on the RPi. To control the pins in python, you can use the python-smbus python package at the lowest level, or you can use one of the many wrapper python classes.
i2c bus support
You also need to install i2c support first if you have not done so already. The original piglow example code has great instructions.
PyGlow.py library
There are many different python libraries written to support the PiGlow board. I like this version by Ben Lebherz here.
Single Threading
The first step is to create a RESTful API server running on the RPi to talk to the PiGlow board. This will allow other software to control the LEDs on and off the RPi. One subtle but important note is that, since there is *one* actual PiGlow board, requests to update the board need to be done in sequence. We cannot have everyone writing to the i2c bus at the same time. So one important feature of the API server is that it single threads all the control operations, without blocking the API requests. i.e. the controlling of the board is done asynchronously from the actual API request/response.
The locking is acheive using a Lock object from the threading library.
Once a global lock object is created by calling threading.Lock(), all operations are wrapped with calls to acquire and release methods. In my code I use the python with statement to do this nicely.
# wait for lock becoming available if necessary
with lock:
    # here the lock is locked
    led_list[num - 1]['brightness'] = brightness
    pyglow.led(num, brightness=brightness)

# and the lock is unlocked
The asynchronous operations is done by putting the actual work in a separate thread from the thread that is handling the inbound REST request. The queue_command method in the PiGlowResourceMixin starts a thread to perform the operation, leaving the main thread to continue to response to the caller:
def queue_command(self, func, *args):
        """
        Queue function func with optional args in a separate thread.
        """
        h = threading.Thread(target=func, args=args)
        h.setDaemon(True)
        h.start()
        return h
REST API
Flask has a nice plugin call Flask_RESTful that makes writing REST API servers very easy. In our server, we subclass Resource from restful, which provides routing of calls and argument parsing. Each type of "things", LEDs, LED arms, and LED rings (colors) are all addressable objects via the REST API.
For example: (LedAPI)
class LedAPI(PiGlowResourceMixin, Resource):
    """
        REST interface to control individual LED.
    """
    def get(self, led_id):
        """
        Get the brightness of a LED.

        (These are cached values, not necessary correct!)
        """
        return led_list[led_id]

    def put(self, led_id):
        """
        Set the brightness of a LED

        PUT /leds/:id

        URL Parameters:
        id=[integer] in the range of 1-18

        Optional:
        brightness=[integer 0-255]

        Data Parameters (optional):
        {
            "brightness": [integer 0-255]
        }
        """
        self.validate_led_id(led_id)

        parser = reqparse.RequestParser()
        parser.add_argument('brightness', type=int, default=0,
                            help='Brightness for this arm of LED')
        args = parser.parse_args()

        b = args.get('brightness')
        self.validate_brightness(b)

        self.queue_command(set_led, led_id, b)
        return led_list[led_id - 1]
Mixin
We also use a python feature called mixin to add common functionality to all the API interfaces. The validation methods are shared this way. And most importantly the queue_command method which provide the threading support is added to all the endpoints using this mixin.
The RESTful API Server
You can start the API server by just passing the file to python. For example:
python /usr/local/lib/python2.7/site-packages/piglowserver/piglowserver/pg_rest_server.py
API
The API server responses to a set of PUT requests to control individual LEDs, list of LEDs, "arms", and "colors". See the readme on github () for full documentation. But a quick example will give you an idea:
    # set arm 3 to brightness 50
    curl -X PUT -d brightness=50 http://localhost:5000/arms/3

    # switch on and off LED 7
    curl -X PUT -d brightness=100 http://localhost:5000/leds/7
    curl -X PUT -d brightness=0 http://localhost:5000/leds/7

    # switch on led 3 and 5 with brightness 10 and 200
    curl -X PUT -H 'Content-Type: application/json' \
        -d '[{"led_id":3, "brightness": 10}, {"led_id":5, "brightness":200 }]' \
        http://localhost:5000/leds

    # excute a starburst pattern
    curl -X PUT -d brightness=100 http://localhost:5000/patterns/starburst

    # turn everything off
    curl -X PUT http://localhost:5000/patterns/clear
CORS / CSRF Issues
The REST server is designed to be access either directly from another application, or from a web based application. Using our angular one page application (localhost:8000/app) as an example, that web page contains client side javascript code that access the REST server via the API.
However, all modern browser consider this type of access, where a web page served from one server try to access resources on another server, it performs a cross site request forgery ( CSRF ) check. Therefore the REST server is setup to add a CORS header "Access-Control-Allow-Origin: *" to all responses, allowing this type of cross site access.
The Web Application Server
The REST API is designed for used by another software applications. You can call it from another computer system, using the PiGlow board as a display station remotely. To demonstrate this connection, this project also include a very simple web application server, pg_control.py. You can run this server, also a flask application, and control the REST server remotely. The pg_control server can be run on the same RPi, a different RPi, or on a completely different machine.
python /usr/local/lib/python2.7/site-packages/piglowserver/piglowserver/pg_control.py
The Javascript Client
You can also run the simple angularJS powered single page javascript client to control the PiGlow board. Just point your browser to the /app URL in the pg_control server above.
A Command Line Weather Display Client
Finally, we have a simple example to query Yahoo weather for the temperature in a simple Python script, and display the result with LEDs. Look in the examples/weather.py script. You will need to modify the script to access your particular REST server's IP address, as well as put in your own city name.
Because I am running it on a mac, I have included a plist file that you can use to schedule the weather client to run every hour on your mac.
For the Impatiences
If you just want to install all the software and try it, follow these steps:
- Enable the i2c support, following these instructions
- Add your user ID ("pi" normally) to the i2c user group with sudo adduser pi i2c
- Install Ben's library with: pip install git+https://github.com/benleb/PyGlow.git
- Install my software pip install git+https://github.com/pkshiu/piglowserver.git
- Install additional python packages required for the piglowserver using my requirement files: pip install -r /usr/local/lib/python2.7/site-packages/piglowserver/requirement.txt
- This will install three common python development tools: flask, flask-restful and requests onto your system.
- Run the API server: python /usr/local/lib/python2.7/site-packages/piglowserver/piglowserver/pg_rest_server.py (it will start listening on port 5000)
- Run the web application: python /usr/local/lib/python2.7/site-packages/piglowserver/piglowserver/pg_control.py (it will start listening on port 8000)
- Point your browser, on the RPi or on a different machine, to the web application: <RPi_IP_Address>:8000
- Try it out!
- Also try the client side application: <RPi_IP_Address>:8000/app
Conclusion
This project demostrates the power of the RaspberryPi. While I also like the Arduino, the RPi has a rich development environment that allows for some powerful computing projects.